Forum
Questions, builds, help and the odd argument. The mods and guides are out front.
Notifications
Clear all

Topic starter
Jul 25, 2014 11:33 pm
So I have a bumper that I want to use to replace another mesh. I want to replace Skylines' supra's bumper2 with my own. First I imported bumper 2 in zmod and aligned my bumper to be the exact same size and place as his. Then I set it up to use the same material as his. After that I got it into 3ds max and again set up the material (by watching David S' tutorial) along with the object name. I exported it as v4 and opened the .tex. Got all the correct texture id's and edited the .rdb/rdk for the load order. However in game I can't see the bumper. I can purchase and install it fine but I can't see it. What am I doing wrong here?
Just in case here is the .tex
Spoiler: paint.png
chrom.png
and here is the .rdb
Spoiler: <FILE 00000396.res >
typeof 14
superid 0x00000005
typeid 0x00000BA2
alias F
isparentcompatible 1.00
</FILE>
<FILE 00000396.rsd >
mesh 0x00000AA2
flags 8.000
lod_amp 3.000
shd_center 0.000 0.000 0.000
shd_diru 0.000 0.000 0.000
shd_dirv 0.000 0.000 0.000
shd_vbase 0.000 0.000 0.000
shd_vup 0.000 0.000 0.000
texture 0x000000AB *this is paint.png
texture 0x0000008B *this is chrom.png
</FILE>
and the cfg if needed
Spoiler: # Vehicle importer wizard generated part configuration file #
resource ID of this part: 0x00000AD2
resource alias of this part: "F bumper 2"
render 0x00000BA2
mesh 0x00000AA2
texture 0x00020025
click 0x00000A20
body -0.253 0.003 -0.052 0.000 0.000 0.000 6.000 cars\racers\Skypra_data\meshes_phys_F_bumper_CL.scx ;0x00000015
body 0.253 0.003 -0.052 0.000 0.000 0.000 6.000 cars\racers\Skypra_data\meshes_phys_F_bumper_CR.scx ;0x00000016
body -0.671 -0.022 0.000 0.000 0.000 0.000 1.500 cars\racers\Skypra_data\meshes_phys_F_bumper_L.scx ;0x00000017
body 0.671 -0.022 0.000 0.000 0.000 0.000 1.500 cars\racers\Skypra_data\meshes_phys_F_bumper_R.scx ;0x00000018
total mass: 15.000 kg
category 2
slot 0.000 0.100 0.276 0.000 0.000 0.000 1 ; F_bumper
attach 0x00000006 1 ; chassis->F_bumper
attach 0x00000B06 1 ; chassis->F_bumper
'F bumper' deflector
wing 4 0.002912870 0.000000000 -0.018332100 0.000000000 -0.010889600 -0.639588000 1.936230000 -0.250 0.666
eof

Jul 26, 2014 11:56 am
can you do one thing for me, go back to your max model right before export, scale it up to 1000 export and see if you can see it in game, if not revert the scaling and scale it up 10000 and re-export again.
it sounds like your mesh is either TOO small or TOO big to be see in game, if I remember correctly zmon downscales the mesh 10000x times on import.
Topic starter
Jul 26, 2014 12:12 pm
Oh man thanks a lot. I knew it had to be something wrong with the export since the scripts are on point.
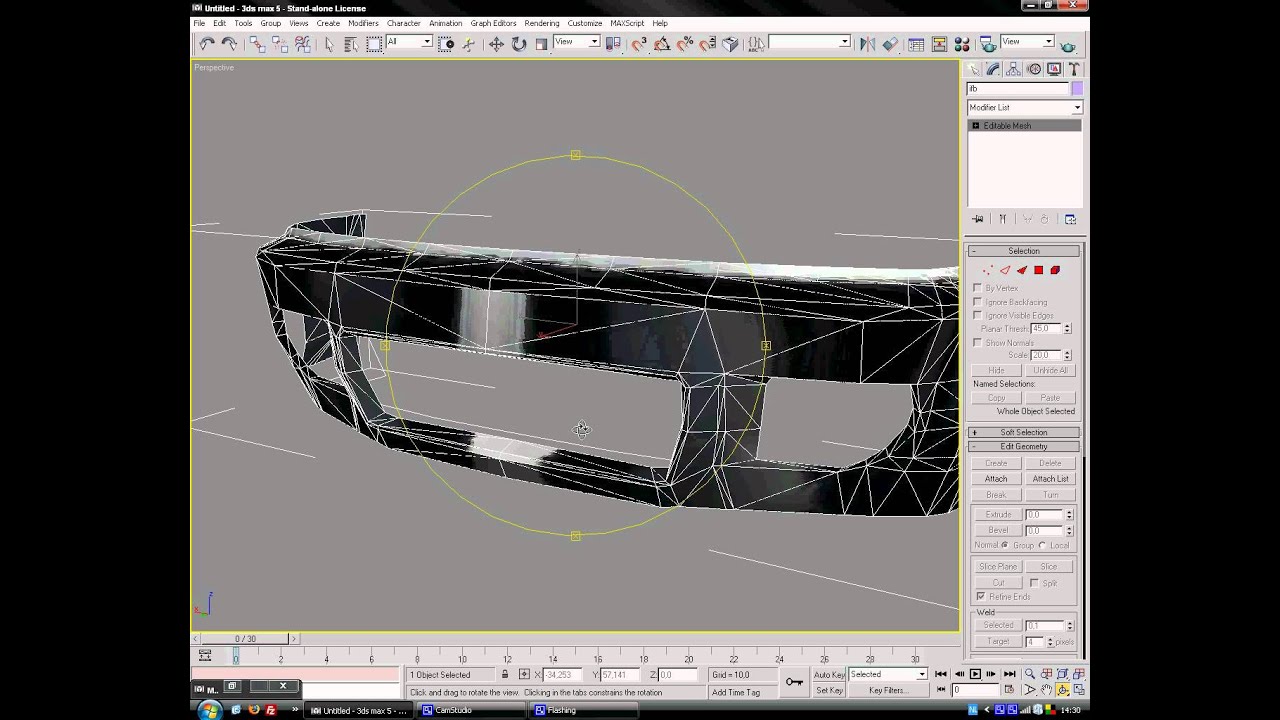
But now there is another issue. The bumper is 180 rotated on the Y axis (even thought I rotated it to fit the original bumper in zmod, but zmod probably fucked it up). The scale and the placement are too. Now how can I get a correct scale without changing it and experimenting and how do I fix the position? I think I did something wrong. What I did was enter edit poly mode and select effect pivot only and moved the pivot to the coordinates which are in the main.cfg, at least this is what i saw in David S' tutorial. I think it might do something with local axes, since this is what causes things like this in san andreas. It's probably the pivot though.
Here is a picture (please ignore the bad materials and broken mesh lol)
Spoiler:
Added 12 minutes later:
Turns out I was getting the wrong numbers (from main.cfg) I got the ones from the bumper's cfg and it kinda works. Can I get a correct scale somehow or do I need to test and fail to find the right one?
Spoiler:

Jul 26, 2014 2:01 pm
the precise z3d to slrr scale(you must do it on 3ds max) is 10025
Jul 26, 2014 2:09 pm
yup just scale it up/down in max till you get it right 🙂 BB seems to know the correct scale.. I knew it was around 10k.
Topic starter
Jul 26, 2014 2:13 pm
# Bigg Boss93 :
the precise z3d to slrr scale(you must do it on 3ds max) is 10025
I kinda adjusted the scale by trial and error to 8340. Also had to make up my own numbers the same way to move it to the correct place, the ones from the .cfg were close. Now the problem I am having is I can't get the materials correctly.
The bumper is paintable but it looks bad and can't put decals on it. I use the original load order, but even if I edit it (delete the lines with the textures im not using since I use the same textures as original bumper) it's still the same.
Pics from max.
Added 1 hour 37 minutes later:
The placement is fine but whatever I do I can't get the materials to look right. I found some old tutorials but the pics aren't loading and I must be doing some mistake... The bumper has absolutely no reflections or specular lightning and the colors are not saturated at all.
Added 12 minutes later:
The last thing I did was open the material editor
spec 100
gloss 40
diffuse is mix - default_red.png
paint.png
paint.png copied Alpha Mono
reflection 70 - reflectionimage.png
all these textures are in the .tex and in the rpk
Jul 26, 2014 4:10 pm
WOOT WOOT, too much of everything, also you better use bitmap instead of mix on paintable(diffuse), mix is not used anyways.
I suggest you to keep the reflection at about 15-20, not more not less.
Topic starter
Jul 26, 2014 4:20 pm
# Bigg Boss93 :
WOOT WOOT, too much of everything, also you better use bitmap instead of mix on paintable(diffuse), mix is not used anyways.I suggest you to keep the reflection at about 15-20, not more not less.
I use 'mix' when I click on diffuse so I can get the menu where I can put 3 textures, for which I use bitmap when I select them
Added 1 hour 19 minutes later:
This is the tutorial I followed.
Added 49 minutes later:
Not using mix and just one bmp (paint.png) seems to have made it a lot better, but still the color is weird and decals aren't working. The reflections are very weird too.
Jul 26, 2014 7:26 pm
are you sure you have it mapped? you need to do a UVW mapping on the colour texture for it to be paintable properly and work as it should.
Topic starter
Jul 26, 2014 7:46 pm
# Jesus Christ :
are you sure you have it mapped? you need to do a UVW mapping on the colour texture for it to be paintable properly and work as it should.
Yes
Added 1 hour 52 minutes later:
If I try to put a paintjob on it in game the paintjob texture works as a reflection, Very weird since i put the paint texture as diffuse and an env map/chrome texture/any kind of reflection texture as reflection...
wtf can't upload pics to the site's server
Spoiler:
Jul 27, 2014 12:40 pm
are you sure you're loading order is correct? are you sure you did the mapping on the PAINT texture?
Topic starter
Jul 27, 2014 12:55 pm
# Jesus Christ :
are you sure you're loading order is correct? are you sure you did the mapping on the PAINT texture?
yes, the mapping is done for the paint texture (on both uv channel 1 and 2) the uv works in games like san andreas and gta iv (on the same bumper).
Here is my loading order. I tried it in different ways too but still no result.
texture 0x000000AB - paint.png
texture 0x00020025 - default_red.png
texture 0x000000A5 - odleskchassis.png (reflection)
all the other bumpers use these textures (and more)
I tried it with 0x00020025 on top too but no difference

Jul 27, 2014 1:02 pm
default_red.png is texture 0x00020024
add it to in cfg of bumper
Jul 27, 2014 1:05 pm
what blast said 🙂 20025 is white.
Page 1 / 2
Next